Mountain Mods Ascension CYO (Custom Computer Case)
Customization Options
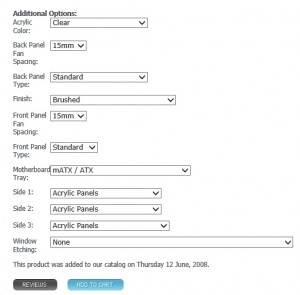
The beauty of this case is all of the available options. Let me just say something that I forgot to mention before. This case is strictly made for water cooling builds only. So when you go into the Ascension CYO product page you will see a ton of different options. I know that I sent Ben over at MM a ton of different revisions of what I wanted because I kept second guessing myself. Just remember to take your time and check over everything ten times before you submit your order.
Our first option to choose is the acrylic color. You can go with the traditional clear acrylic like I did or if you want to produce some cool effects with your lighting you can choose from a variety of UV colors that include blue, green, and orange. If you are doing a sci-fi build you can go with a smoked grey acrylic or even mirrored!
Our next option is the back panel fan spacing. The industry standard is 15mm which most radiators follow, but if you have some older Thermochill PA radiators lying around you are going to want to choose the 25mm fan spacing option.
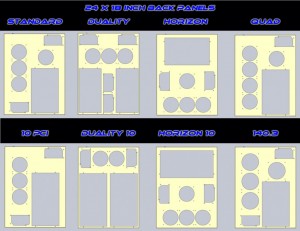
Next we have the options for the type of back panel that fits your needs. There are a variety of choices that include Quad, 140.3, 10 PCI, Horizon, Duality, Duality 10 PCI, and the Horizon 10. All of these are made for vertical motherboard trays except for the Horizon. If you do choose the Horizon make sure to specify the correct motherboard tray to go with it. The back panel are pretty self-explanatory by the pictures. Just choose the panel that will support your radiator/fan needs the best.
Our next option is the finish. Mountain Mods has an amazing selection of finishes and if you happen to not like any of them you can pay extra for a custom powder coat color of your choice! My personal favorites are the Anodized Black that I received and the Mirror Black.
Below the finish’s you will see the option for the front fan spacing. This really isn’t an option because the only available spacing for the front panel is 15mm. This should work for everyone unless you have a ton of older Thermochill PA radiators lying around.
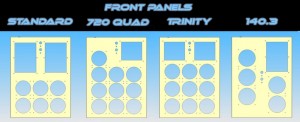
Next we have the option for the type of front panel that you would like to receive. This decision should be made by weighing out your radiator and bay needs. MM has a great selection to help you get the type of front panel that will perfectly fit your needs. You can choose between Standard, 720 Quad, Trinity, and 140.3. Again, the designs should be self-explanatory by looking at the picture.
Now we get to the option where you select the type of motherboard tray that you need. Make sure you know the form factor of your motherboard because it would be pretty disappointing to assemble the case and realize that your motherboard won’t fit onto the tray. The options available are M-ATX/ATX, XL-ATX, E-ATX (SSI-EEB Compliant), and HPTX. When choosing the Horizon back panel you are going to want to choose the HPTX motherboard tray. This is for motherboards like the EVGA SR-2, but will also fit other sized motherboards.
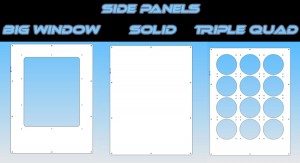
Next we have to pick our two side panels. All side panels are the same and can be switched around accordingly so you don’t have to worry about picking out the front side panel and the rear side panel. The two side panels are labeled as “Side 1” and “Side 2”. Your options here are a standard Solid ALU Panel, a Big Window Panel, and if you need even more radiators you can choose the Triple Quad side panel. Remember, this case is all about overkill.
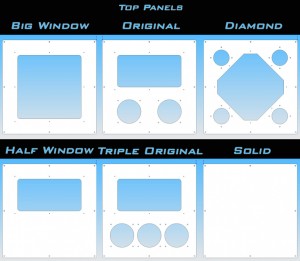
Next you will see an option for “Side 3”. This is your top panel. Your options here are a Solid ALU Panel, Big Windowed Panel, Original Panel, Diamond Panel, Half Window Panel, and the Triple Original Panel. What a selection for something as miniscule as a top panel. This is what Mountain Mods does. They take every detail of the case very seriously so that you can have a very personal feel when you get the case.
Our last option is window etching. Mountain Mods does a fantastic job with this and the results are nothing short of incredible as you can see by my “Modders-Inc” side panel. The window etching is definitely worth the extra money. All you have to do is send MM an image file of what you want etched into the acrylic. Make sure it is high quality though unless you are going for a pixel look! One window costs $20 extra, two windows costs $30 extra, and three windows costs $36 extra.
