Modding and Multimeters
Reading a Resistor:
Take the probes and touch them to the two solder leads on the resistor. Read the display for the value of the resistor. I like this because like most modders, there are always extra parts and values are sometimes forgotten. So resistance testing is easier than reading the color values on the resistor.
Note the reading on the resistor of 2.7 kilo Ohm and the meter reading of 2.673 kilo Ohm.
Resistance:
Before starting, some meters may need to be "Zeroed", if the one being used does then do this first or the readings will be off. Hold the two probes together and adjust it to 0 Ohms with the method given for your make of multimeter. Most that still need "zeroed" have a wheel just for the function.
Continuity Cable Checking:
Using the resistance function of a meter cables can be checked for a break, or to figure out what wire goes to what pin. Touch one probe to the wire or pin at one end and then the other probe to each pin until a reading close to 0 ohms are found. Draw a picture of the connector so each one can be labeled with the color of the wire. Repeat this until all the needed pins are checked.
Cable pins are found when the lowest resistance is found.
Continuity Setting:
Some multimeter's have a setting for continuity. This is great because when the probes are crossed it beeps. So testing cables can be done without taking your eyes from the work, hence speeding the testing up.
Capacitance:
*Never test a Powered or charged Capacitor!!*
There are two types of capacitors, standard and polarized, the two can be found by the markings on the outside. A polarized capacitor has a strip on the side denoting the (-) negative lead and standard capacitors are just marked with the value and voltage capability. This function is good for checking parts are the right value and good before assembly of a mod.
Standard capacitor testing:
Touch a probe to each leg of the capacitor, and get a reading. Note the display and prefix of the test, as there is a big difference between microfarad (mf) and nanofarad (nf). jot down the reading just as careful so you don't mistake things when read to use the parts.
standard cap test and meter reading
Polarized capacitors testing:
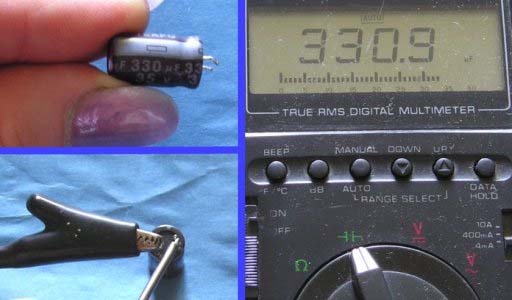
With a polarized capacitor look for the negative (-) to show the negative leg. The negative leg is where the black probe is touched. The other is where it red probe goes. As with the standard test take careful notes, as misreading a polarized capacitor can lead to severe danger to people and property.
Note the cap marking of negative and of 330 uf and the meter reading of 330.9 uf
Temperature:
This is very dependent on the meter, but there is a method to follow. Select the function first. The probe should be close but not touching the area being tested (in the path of a fan exhaust). Wait until the display stabilizes to jot down the reading. Temperature function is good to check room temps, or test the accuracy of the on-board temperature diodes.
Using a multimeter is a great value to modders, but like other tools in the modding arsenal, care is needed. It can be invaluable with custom mods that involve electric, or the flaky part that works only part of the time. This doesn't cover all that a multimeter can do or all the tests that can be done with the functions explained, but use this to understand what information to look for as you learn to mod bigger and better. I hope reading this will help in the understanding of electric for PCs and ways to check parts for the PC.

