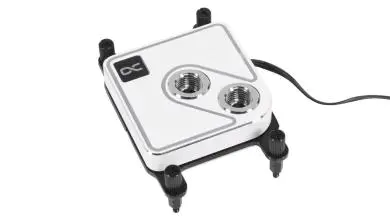
EKWB-Supremacy Classic RGB – Nickel + Plexi Waterblock Review
Flash back to the past
Test System and Results
Test System:
| Component |
Product Name | Provided By |
| Processor | Intel Core i7-8700K (Retail) | reviewer |
| Motherboard | Gigabyte GA-Z370-Gaming 7 | Gigabyte |
| Memory | G.Skill SniperX 2x8GB @ 3400MHz 16-16-16-36 (XMP) | G.Skill |
| Drive | Samsung 240 EVO 256GB SSD, Crucial MX500 1 TB SATA III SSD | reviewer |
| Video Card | Nvidia RTX 2080 Founders Edition | Nvidia |
| Radiator(s) |
EKWB EK-Coolstream PE 360 | EKWB |
| Pump |
EKWB EK-XRES 140 SPC PWM Classic | EKWB |
| Fans |
EKWB EK-Vardar F4-120ER | EKWB |
| Fittings |
Bitspower 7/16 ID, 5/8 OD compression | Titan Rig |
| Tubing |
XSPC FLX Clear UV 7/16 ID, 5/8 OD | Titan Rig |
| Thermal Compound | Noctua NT-H1 | Noctua |
| Case | DimasTech EasyXL | DimasTech |
| Power Supply | Cooler Master Silent Pro M2 1500W | Cooler Master |
| Operating System | Windows 10 x64 Pro with latest patches and updates |
The test was conducted on a DimasTech EasyXL open-air test-bench.
For this review, I ran two sets of tests.
The Stock test was run with the CPU set to the stock settings in the BIOS. The radiator fans and pump were set to the normal setting in the Arous BIOS. This allows the fans and pump to spin up and down based on temperature. The stock temperature curves in the BIOS were used. I chose to do this for the stock test to mimic a low noise set up. I wanted to fans and pump to be quiet with at the same time get good cooling performance.
The Overclock test was done with custom settings. I set the voltage for the CPU at 1.249v for Vcore and set the multiplier on all cores at 48. The pump and radiator fans were set to full speed in the BIOS settings.
The EKWB radiator had just been cleaned using Mayhem’s Blitz kit. The loop was filled with fresh distilled water (no additives) and was run without load until most of the air worked its way back to the reservoir.
To monitor loop temperature, I used two XSPC inline temperature sensors. During the test, I waited for the coolant temperatures to stabilize (about 30 minutes). From there the statistics were cleared and another 15 minutes were put on the clock before the last minute average. Coolant temperatures were taken at the same time as the CPU temperatures.
Temperatures are averaged (last minute) from individual core temperature results monitored by AIDA64 after 15 minutes using the default CPU, and Cache simultaneous load. AIDA64 is able to use the latest instructions including AVX and AVX2, etc unlike other older CPU load tests so it is also a lot more “future proof” as more software start to utilize it. PU-only load average is used to simulate worst case scenario load levels similar to Intel Burn Test or OCCT. Please keep in mind that this test is brutal and not even close to real-world load (especially not that constant for that amount of time). Results marked “100″ and in red means, the thermal limit was reached and the CPU throttled, even for just but a second. This includes results where even just the first core reached the limit and even if it briefly happened. It is marked as 100 in red in the review if it happens three times. Three runs are conducted per cooler and a fourth run is done after a remounting to verify. Last minute average is taken instead of peak because it represents the averaged behavior of the thermal performance instead of worst-case scenario or a snapshot. Temperature delta results are used to account for variance in the cooling system. Room temperature is set at 19°C.
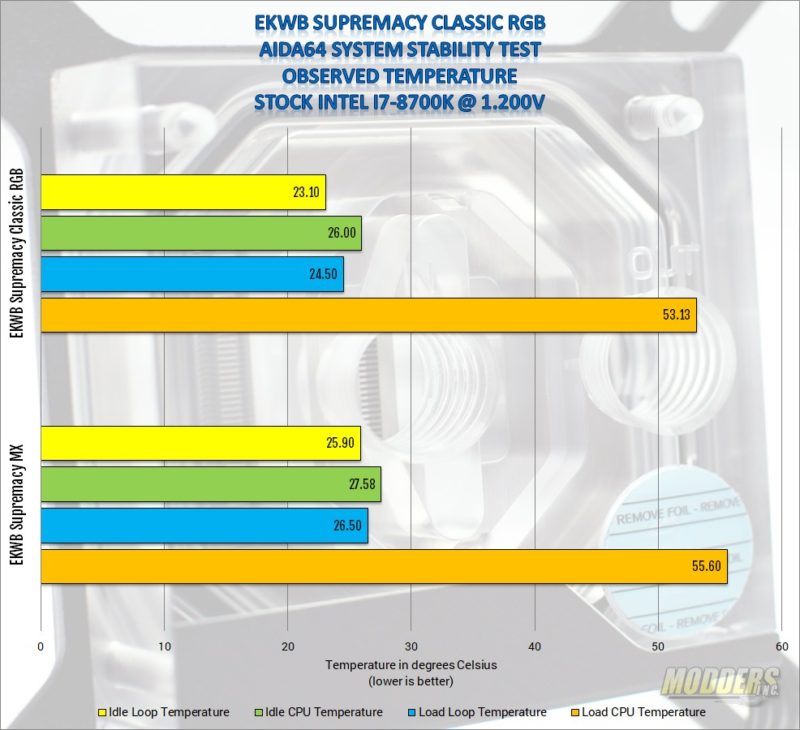
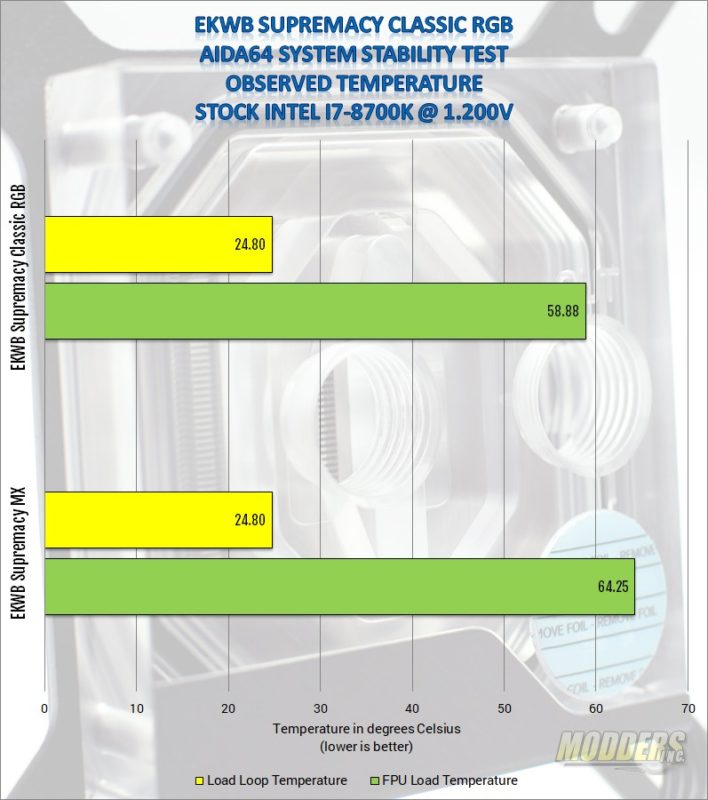
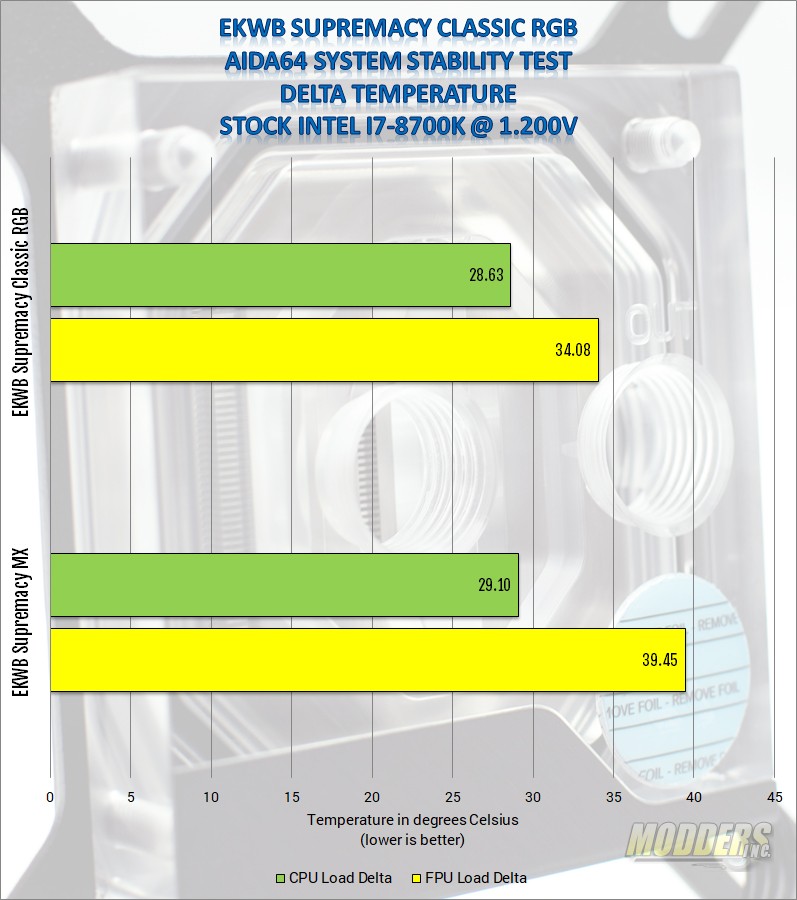
With the Intel i7-8700k using the motherboard defaults and the fans and pump set to “normal” in the Aorus BIOS settings, there a few degrees of difference between the Supremacy Classic and EKWB’s previous generation “budget” waterblock; the Supremacy MX. However, when we pour a bit more heat into the system by using the FPU test, the gap between the block widens a bit.
The delta temperatures confirm that there is a slight difference when running the Aida64 stability test stressing CPU, Cache, and FPU. But as more heat is applied, the Supremacy Classic is the clear victor.
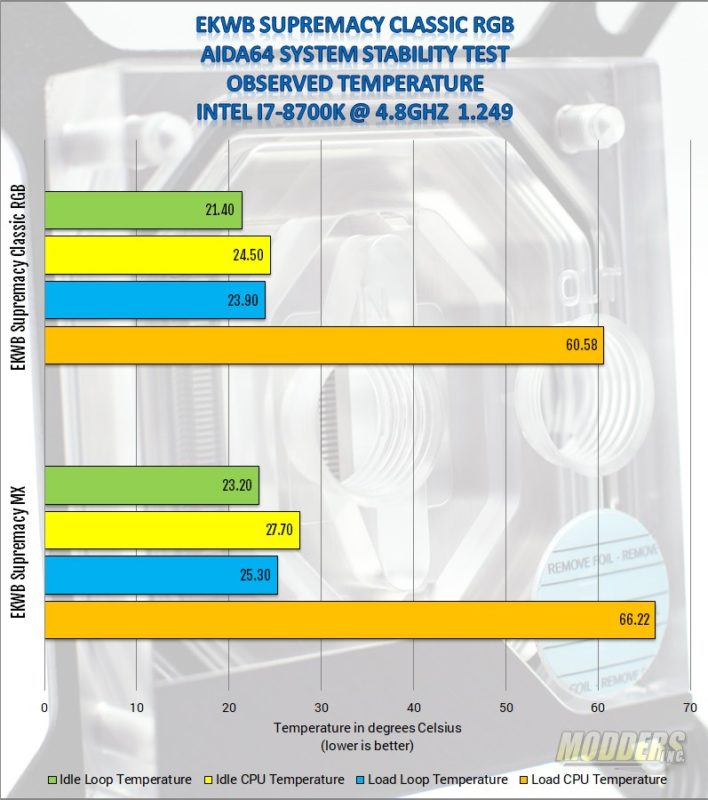
For the Overclocking tests, I set the fan and pump speeds to the “full speed” setting in the BIOS and set the CPU multiplier at 48 on all cores. After a bit of tweaking, I got the CPU to run stable at 4893 MHz with a Vcore of 1.249. Any less voltage and the system would crash the test or blue screen.
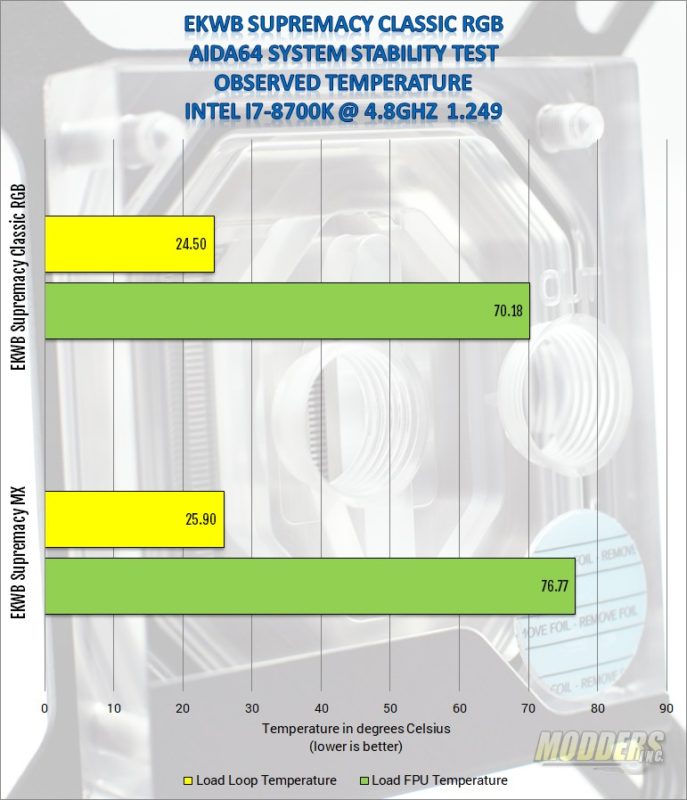
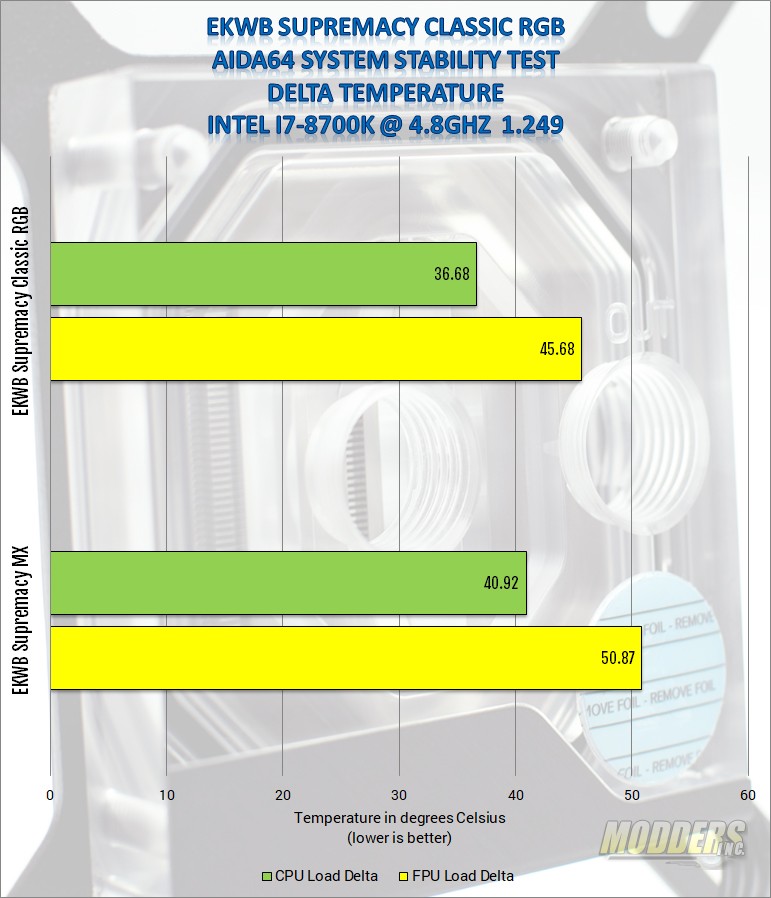
As the frequency went up so did the temperatures as expected. We see a similar pattern with the new EKWB block besting the old, again, as expected.
The Supremacy Classic extends its lead even more which leads me to believe, that I can still get this CPU even further and maybe crack 5 GHz with my retail sample.
